
Enterprise Architect 17 introduces the APM Accelerator Technology as an in-built model pattern, which makes it much easier to stand up a working Application Portfolio Management (APM) setup.
In this guide, we’ll focus on the EA 17 experience: turning on the built‑in Sparx APM accelerator, creating an APM workspace, loading the APM Example Model, and then using it to drive integration views and dashboards.
Note: This guide applies to Enterprise Architect 17. If you are using Enterprise Architect 16.x or earlier, use our APM Excel import guide for Sparx EA instead, where the APM Accelerator is delivered as an external MDG technology and Excel-based model harvest.
Our Experts can help jumpstart your APM with well-defined decision-grade metrics, aligned governance and role-based dashboards.
Prerequisites
Before you start, make sure the following are in place:
- Enterprise Architect 17 installed and licensed
- Access to an EA repository where you can:
- Add model patterns
- Publish and enable MDG Technologies
- (Recommended) A Prolaborate instance connected to the same repository
It is usually easier to work in a new APM project or a clean area of an existing repository, rather than mixing APM content into a very old model.
Step 1 – Enable the APM Accelerator Technology in EA 17
In Sparx EA 17, the APM MDG Technology is generated from the APM Accelerator Technology pattern. That pattern is delivered through the TEA Framework and must first be created in your project.
1.1 Enable the TEA Framework and create the APM Accelerator Technology package
To bring the APM Accelerator Technology pattern into your model:
- In Enterprise Architect, go to Specialize > Manage Technology.
- Make sure the TEA Framework technology is enabled.
- Open Model Builder (CTRL + SHIFT + M).
- In Model Builder, navigate to:
Enterprise Architecture > The Essential Architecture > TEA Accelerators. - Right‑click APM Accelerator Technology and select Create in Project.
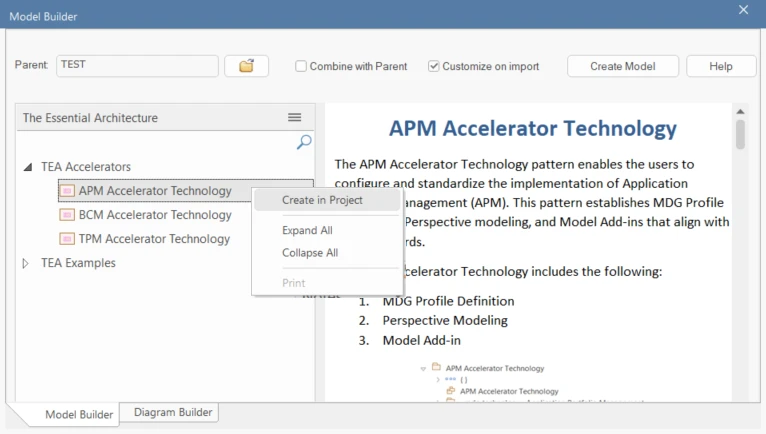
This creates the Application Portfolio Management <<mdg technology>> package in your repository.
1.2 Import the APM MDG Technology into your model
To import the APM MDG Technology into your model:
- In the Project Browser, right click on the Application Portfolio Management package <<mdg technology>> and select Import Package as MDG Technology.
- Alternatively, you can navigate from the ribbon menu, select Specialize > Technologies > Publish Technology > Import Package as MDG Technology.
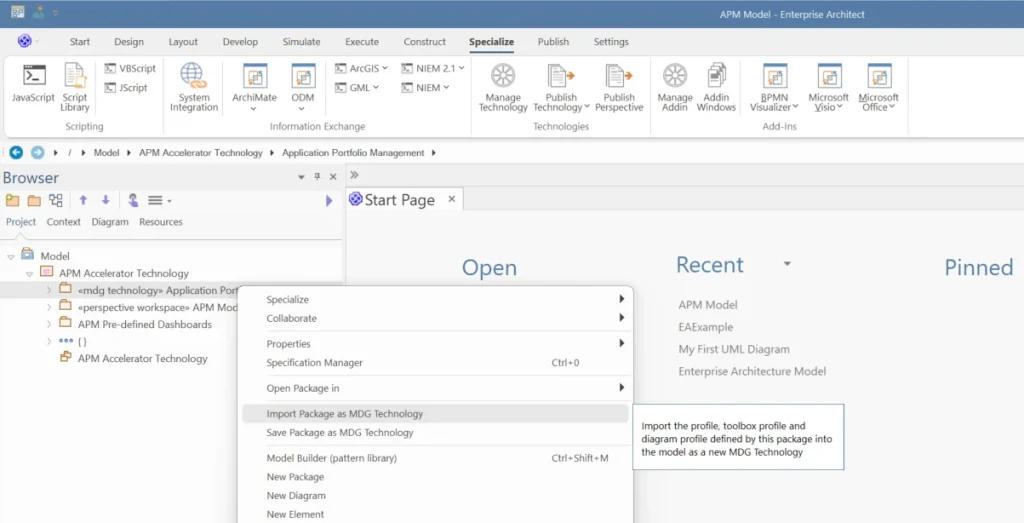
This generates the APM MDG Technology from the pattern and imports it into your model. From this point on, the APM stereotypes, toolboxes and diagram types are available to your repository.
You can confirm this under Specialize > Manage Technology where the APM MDG should appear in the list and be enabled.
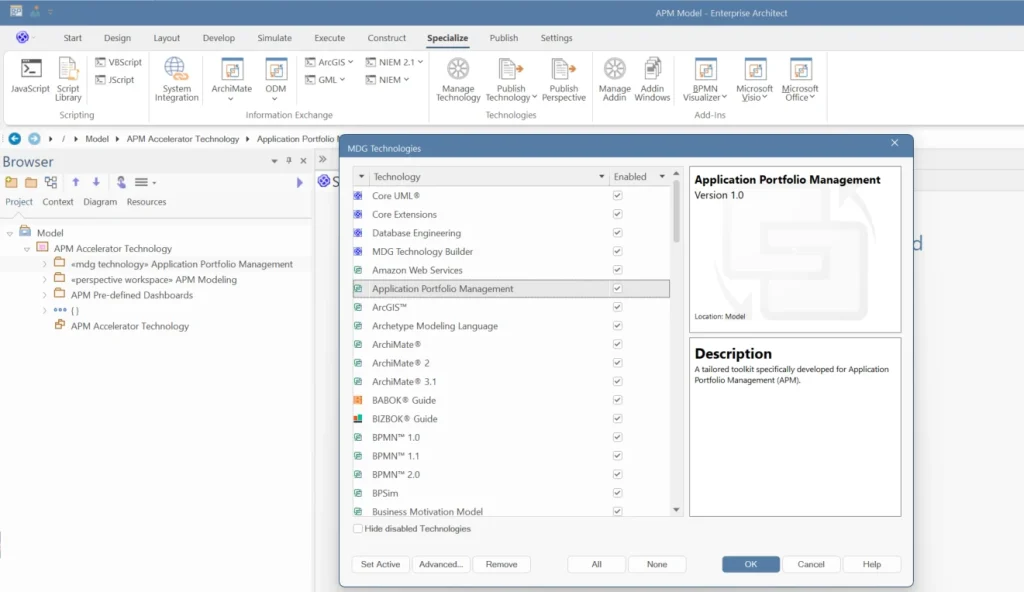
Step 2 (Optional) – Create an APM Workspace in Your Repository
With the APM MDG Technology imported, you can now create the APM Workspace that provides the underlying structure for your APM model. You can use this workspace as the foundation for building your APM model from scratch. If you prefer to start from a pre-defined template instead, you can create the APM Example Model in Step 3, which implements the same structure with sample data.
We will focus on the APM Workspace option from the APM Accelerator, as it is the simplest way to get started.
2.1 Import the APM Workspace
To import the APM Workspace:
- Importing the APM Workspace: This option creates a structured APM workspace that can be used to support scenario-based APM modeling and seeding APM content in a consistent way.
- Prerequisite: The APM MDG Technology must already be imported.
- From the ribbon menu, select Model Builder > Perspective > Specialized > Model Technologies > Application Portfolio Management.
- Click Create Model(s) to import the APM Workspace.
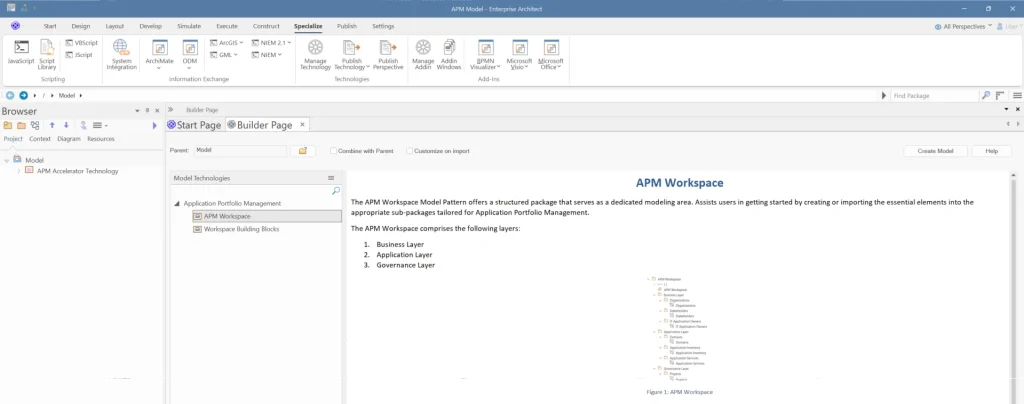
This creates a structured APM workspace in your repository, with predefined packages and diagrams aligned to the APM metamodel.
Step 3 – Import and Explore the APM Example Model
EA 17 ships with an APM Example Model that is already populated with sample Organizations, Domains, Applications, Integrations and Projects. You can treat this as a working template and adapt it to your own landscape, instead of starting from an empty catalog.
3.1 Import the APM Example Model
To bring the APM Example Model into your repository:
- Open Model Builder (CTRL + SHIFT + M).
- In Model Builder, locate the APM Example Model pattern by navigating to Enterprise Architecture > The Essential Architecture > TEA Accelerators.
- Select APM Example Model and choose Create in Project.
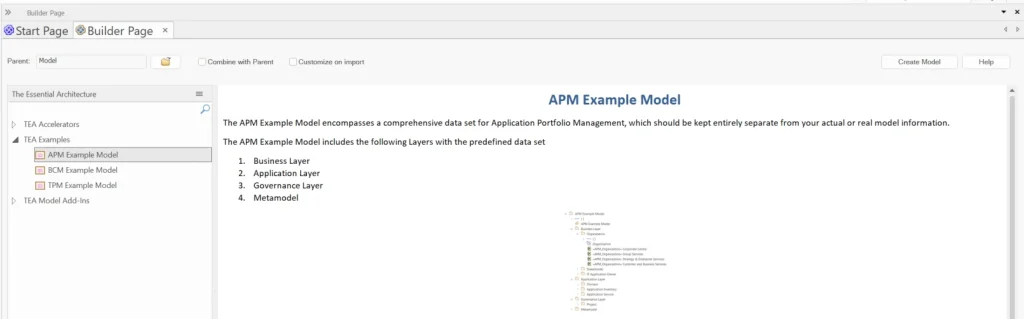
This creates an APM Example Model root (or package) in your Project Browser that is based on the same APM MDG Technology you enabled in Step 1.
You can rename this root or package to follow your own application portfolio naming standards; in this article, we’ll continue to refer to it as the APM Example Model for clarity.
3.2 Understand how the Example Model is structured
Expand the APM Example Model in the Project Browser. You should see a structure aligned to:
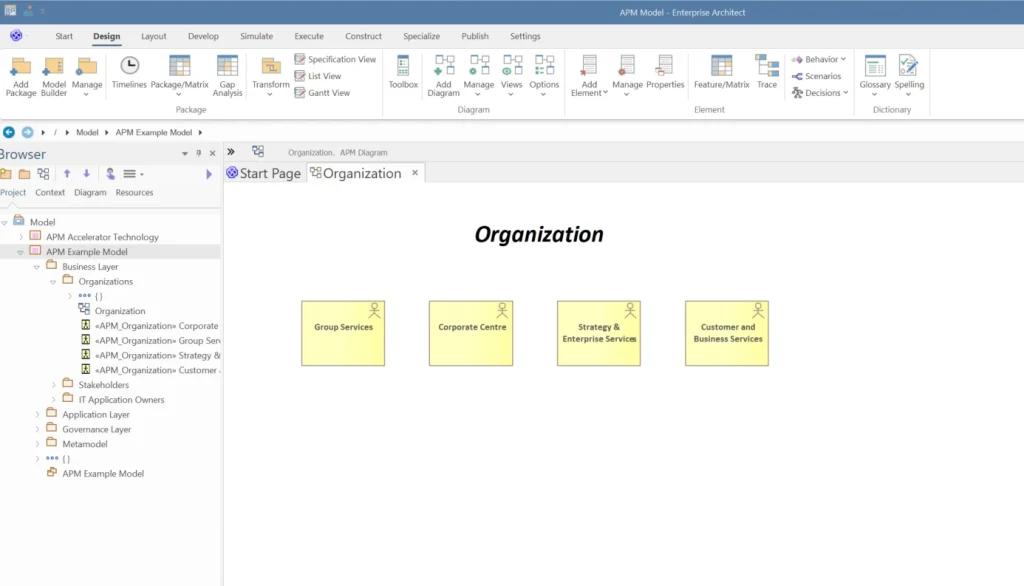
- Business layer – Organizations, Stakeholders, Projects / Initiatives
- Application layer – Application Inventory, Application Services, Domains and Sub-Domains
- Governance / supporting structures – used for road mapping, application lifecycle states and sunset policies, as well as risk views.
This is the same structure that the APM dashboards expect, based on a practical APM data model with standardized fields and attributes.
Step 4 – Tailor the APM Example Model to Your Application Portfolio
The APM Example Model is designed to be edited and extended. You can start by tailoring this model to reflect your own application landscape.
4.1 Decide how you want to use the Example Model
You have two common options:
- Use the Example Model as your baseline
Keep the structure, then progressively replace the sample Organizations, Domains, Applications and Integrations with your own data. - Copy the catalog structure into your own branch
Duplicate the relevant Business, Application and Governance packages into a separate area of your repository, clear out the sample content, and then populate them with your own elements while keeping the same stereotypes and relationships.
4.2 Typical updates when tailoring the model
As you adapt the APM Example Model, you will typically:
- Update or replace Organizations, Stakeholders and Owners to match your context.
- Align Domains and Sub-Domains with how you group applications today.
- Replace sample Applications with your actual applications, by using best practices for APM data import to accelerate onboarding.
- Add new Applications and Integrations where they are missing in the sample model.
By the end of this step, you have an APM model that still follows the Accelerator’s structure but now reflects your own catalog.
Step 5 – Create and enable the TEA Model Add-In
After you have updated the Application Inventory and Integrations in your APM Example Model, you can use the TEA Model Add-in to automatically generate Prolaborate dashboards.
These steps are the same in EA 17 as in previous versions – the add-in simply runs on top of your APM model.
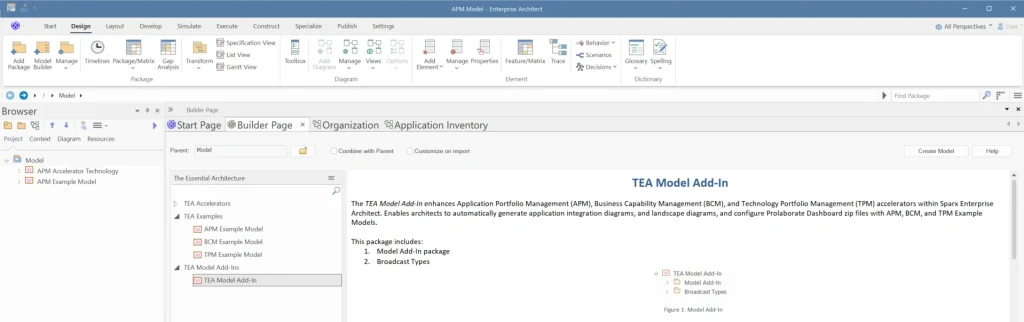
- Open the Model Builder (CTRL + SHIFT + M).
- Select Enterprise Architecture and choose “The Essential Architecture”.
- Create the TEA Model Add-In.
- From the ribbon menu, select Specialize > Manage Addin.
- Enable the “TEA” Add-In and click OK.
Once the TEA Model Add-In is enabled, you can use its APM features to generate integration diagrams.
Step 6 – Configure APM Dashboards in Prolaborate Using the Sparx EA 17 APM Accelerator
The EA 17 APM Accelerator Technology also supports pre-defined dashboards for Prolaborate. The EA 17 documentation describes this under the “Pre-defined Dashboards” section.
6.1 Pre-checks for configuring APM dashboards
Before configuring APM pre-defined dashboards in the Prolaborate Portal, make sure the following prerequisites are met:
- Ensure that the corresponding Enterprise Architect Repository is configured in Prolaborate.
- Verify that the user has the necessary permissions to import dashboards in the Prolaborate Portal.
- Identify the Prolaborate database type (MSSQL / MySQL).
- Import the APM Example Model into the Enterprise Architect Repository.
- Ensure the Date Format in Prolaborate is set to DD/MM/YYYY in the General Settings of the Prolaborate Portal.
Once these are in place, follow the numbered steps below.
6.2 Download the Dashboard Zip file
To download the Dashboard Zip file:
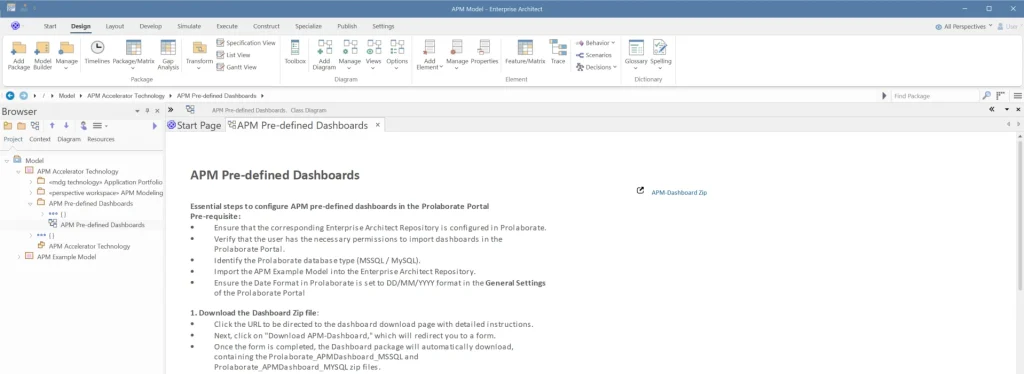
- Double-click on the ‘APM-Dashboard Zip’ URL in the APM Pre-defined Dashboards diagram to be redirected to the dashboard download page.
- Once there, download the Dashboard Package, which contains the Prolaborate_APMDashboard_MSSQL and Prolaborate_APMDashboard_MYSQL zip files.
6.3 Ensure the TEA Model Add-In is enabled
If you completed Step 5, the TEA Model Add-In is already created and enabled, and you can proceed to the next step. If not, follow the instructions in Step 5 before continuing.
6.4 Synchronize the Dashboard Zip file with the APM Example Model
To synchronize the Dashboard Zip file with the APM Example Model:
- Ensure the Prolaborate Dashboard Zip file has been downloaded as per Step 6.2.
- In the Project Browser, select the imported APM Example Model package.
- From the ribbon menu, select the option Specialize > TEA > Configure Dashboards.
- Choose the required Prolaborate APM Dashboard Zip file and click OK.
This synchronizes the dashboard zip with the APM Example Model, so the dashboard configuration aligns with the APM metamodel and data structure.
6.5 Import the Dashboard Zip file in the Prolaborate Portal
To import the Dashboard Zip file in the Prolaborate Portal:
- After synchronizing the dashboard zip file with the model, open the configured Prolaborate Repository.
- Navigate to the Dashboard page.
- Select Import Dashboard, choose the synchronized dashboard zip file, and click OK.
After a successful import, the Enterprise Application Portfolio dashboard becomes available with its layouts and widgets wired to your APM model.
You can use this as a starting point and then tailor labels, filters and visual styles to match your internal vocabulary and KPIs.
Start your APM journey. Learn the fundamentals of portfolio setup, defining risk categories, and building your first dashboards with Sparx EA and Prolaborate.
Wrapping Up
By this point, you have:
- Enabled the APM Accelerator Technology in EA 17 and generated the APM MDG
- Created an APM Workspace (where needed) and imported the APM Example Model
- Tailored the example catalog so it reflects your own organizations, domains, applications and integrations
- Used the TEA Model Add-In to generate integration diagrams, and wired up pre-defined APM dashboards in Prolaborate
You now have a working APM setup in Enterprise Architect 17 that can be extended incrementally as your portfolio evolves. You can refine the model, adjust dashboard filters and add new viewpoints over time, without having to rebuild the underlying structure.


