
In our Sparx APM Accelerator overview, we looked at the Sparx APM Accelerator from a conceptual angle: the metamodel, the APM MDG profile, and the idea of Business / Application / Governance catalogs.
Note: This guide applies to Enterprise Architect 16 and earlier where the APM Accelerator pack is delivered as an external MDG and model patterns. If you are using Enterprise Architect 17, follow our EA 17 APM accelerator setup guide instead, which uses the in-built APM Accelerator and APM Example Model.
In this guide, we will walk through how to take an APM spreadsheet and turn it into a governed APM model inside Enterprise Architect using the Accelerator pack.
By the end, you will have:
- The APM MDG and model patterns enabled in a real EA project
- The APM Excel template and import profiles connected through MDG Integration for Microsoft Office
- Your application inventory and related reference data imported into the APM catalogs, including integrations between applications
This is the step where your APM model stops being an empty structure and starts reflecting your actual portfolio.
Ready to try this in your own repository?
Download the Sparx Systems APM Accelerator to get the metamodel, MDG, example model, Excel template and dashboards all-in-one package.
From Concept to Hands-On: What This Guide Covers
Before we jump into clicks and profiles, it helps to anchor what we are doing.
From Sparx APM Accelerator overview you now have the mental model that:
- The APM Metamodel defines the elements and relationships needed for application portfolio decisions
- The APM MDG Profile and Toolbox provide the correct stereotypes and connectors inside Sparx EA
- The APM Model Patterns give you a standard catalog structure (Business, Application, Governance)
In this guide we will:
- Enable the APM MDG and catalog structure in a concrete EA project
- Understand the APM Excel template and how it mirrors the metamodel
- Configure the APM Excel import profiles using MDG Integration for Microsoft Office
- Import reference data, the application inventory and integrations in the right order
- Validate that you now have a clean APM model you can build on
Prerequisites and Files You’ll Need
Before you start, make sure the basics are in place.
Tooling prerequisites
You will need:
- Sparx Systems Enterprise Architect
- Sparx APM Accelerator Pack
- MDG Integration for Microsoft Office installed and licensed on your workstation
- Access to an EA project where you are allowed to import MDGs and adjust the package structure
It is usually easier to start a dedicated APM project or a clean section of your repository, rather than mixing APM content into a very old or cluttered model.
APM Accelerator files
From the APM Accelerator pack, you should have at least:
- The APM MDG technology file (for example, TEA_MDG(APM))
- The Model Patterns package for APM
- The APM Excel template (often named along the lines of Application Portfolio Management – Excel Template.xlsx)
- The APM import profiles file (for example, APM.profiles) for MDG Integration
- (Optional but useful) a sample Model Harvest project you can open as a reference
Once you confirm that these are available, you are ready to configure your Sparx EA APM project.
Enabling the APM MDG and Catalog Structure in EA
The first step is to make the APM-specific technology available in your EA project and to create the standard catalog structure using the model patterns.
Step 1 – Import and enable the APM MDG technology
- Open the Sparx EA project where you plan to build your APM model.
- In the Project Browser, select the ‘Resources‘ tab and navigate to MDG Technologies > Model Technologies > right-click and select “Import Technology“.
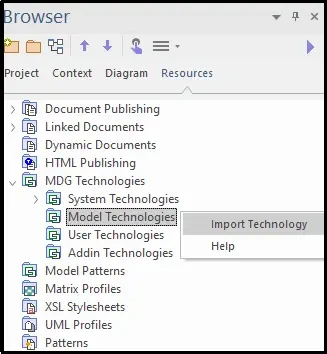
- Select the appropriate MDG file “TEA_MDG(APM)” from the downloaded accelerator pack.
- Confirm the import. The APM technology should now appear in the list of available MDGs in the Specialize > Manage Technology option.
- Ensure the APM MDG is enabled for this project.
- Reload the project so Sparx EA picks up the newly imported technology
Quick check: when you create a new diagram and open the toolbox, you should see an APM toolbox or APM-specific element types available.
Step 2 – Create the APM Package structure from model patterns
Next, we use the APM model patterns to create a standard package structure.
- Place the ModelPatterns package from the Accelerator pack into the EA user path – “C:\Users\AppData\Roaming\Sparx Systems\EA”
- In Sparx EA, select the root node and open the Model Wizard window (press CTRL+SHIFT+M or click on the model wizard icon)
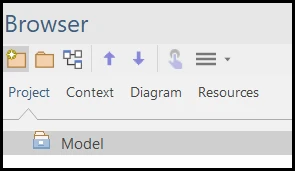
- Click on the Perspective icon and navigate to Specialized > Model Technologies.
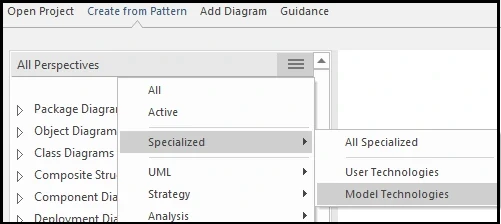
- Select the required model pattern, for example, Business Layer and click “Create Models” to create a catalog for the Business Layer.
- Similarly, create the required packages for Application and Governance Layers.
You do not need to spend much time fine‑tuning this structure right now. The important point is that you have a consistent layout that matches the expectations of the Excel template, import profiles and dashboards.
Understanding the APM Excel Template
The APM Excel template is your bridge between existing spreadsheets and the EA APM model. It is structured to mirror the APM metamodel and catalog structure.
What the template captures
A typical APM Excel template contains separate sheets for the main APM concepts, for example:

- Organizations – business entities or units
- Stakeholders – roles and individuals related to the portfolio
- IT Application Owners – accountable owners for each application
- Projects / Initiatives – change efforts that impact applications
- Domains and Sub‑Domains – how applications are classified
- Application Services – logical services provided by applications
- Application Inventory – the list of applications and core attributes
- Application Integrations – connections between applications
You can start by copying your existing spreadsheet content into the relevant sheets, or by filling out the template directly.
How the sheets map to APM elements
Each sheet in the template is designed to map to a specific APM element type and catalog package in EA. For example:
- The Organizations sheet maps to Organization elements stored in the Business catalog
- The Stakeholders sheet maps to Stakeholder elements in the Business catalog
- The Application Inventory sheet maps to Application elements in the Application catalog
- The Application Integrations sheet maps to connectors between Application elements
Import profiles (which we configure next) use this mapping so that, when you import, EA creates the right element type in the right place, with the right stereotype and tagged values.
Our Experts can help jumpstart your APM with well-defined decision-grade metrics, aligned governance and role-based dashboards.
Configuring the APM Excel Import Profiles (MDG Integration for Microsoft Office)
To turn the Excel template into Sparx EA elements and connectors, we use MDG Integration for Microsoft Office and a set of APM‑specific import profiles.
Loading the APM import profiles into Sparx EA
- Open Enterprise Architect and ensure MDG Integration for Microsoft Office is installed.
- Go to the MDG Integration menu (navigate to Specialize > Microsoft Office > Profile Manager > Excel Profiles).

- Click Import and select the APM import profiles file (for example, APM.profiles) from the Accelerator pack.

- After importing, you should see profiles such as TEA-Organization, TEA-Stakeholder, TEA-Application, TEA-ApplicationIntegration and so on.
- Associate these profiles with the APM Excel template workbook if prompted.
Once this is done, MDG Integration “knows” how each sheet in the template should be translated into EA elements or connectors.
How import profiles work at a high level
Each import profile defines a mapping between:
- Columns in a particular Excel sheet, and
- Fields or tagged values on an EA element or connector
The same Excel workbook can be imported multiple times with different profiles: one profile for Organizations, one for Applications, one for Integrations, and so on. This is what keeps your imported model aligned with the APM metamodel rather than creating generic classes or free‑form connectors.
Recommended Import Sequence for a Clean APM Model
You can technically import sheets in any order, but you will get a cleaner model if you follow a logical sequence. The idea is to import reference data first, then the applications, then the integrations.
A practical sequence is:
- Organizations
- Stakeholders
- IT Application Owners
- Project
- Application Service
- Domain
- Sub-Domain
- Application
- Application Integrations
This way, by the time you import Applications and Integrations, most of the referenced elements already exist in the model.
Model Harvest Using Sparx APM Import Excel Spreadsheet
In the context of the APM Accelerator, “Model Harvest” simply means bringing the key APM elements from the Excel spreadsheet into your Sparx EA APM catalogs. Using MDG Office Integration and the APM import profiles, you can load Organizations, Stakeholders, IT Application Owners, Projects / Initiatives, Domains and Sub‑Domains into the correct packages in a consistent way.
General steps to import each sheet
For each of these sheets (Organizations, Stakeholders, IT Application Owner, Projects, Domains and Sub‑Domains):
- Select the required package (Organization, Stakeholders, IT Owner, Projects, etc.,) from the Sparx EA Project Browser window.
- Ensure the data is filled in and that key identifying columns are populated in the excel sheet.
- In Enterprise Architect, open the Excel Importer window by navigating through Specialize > Microsoft office > Import Excel Document.
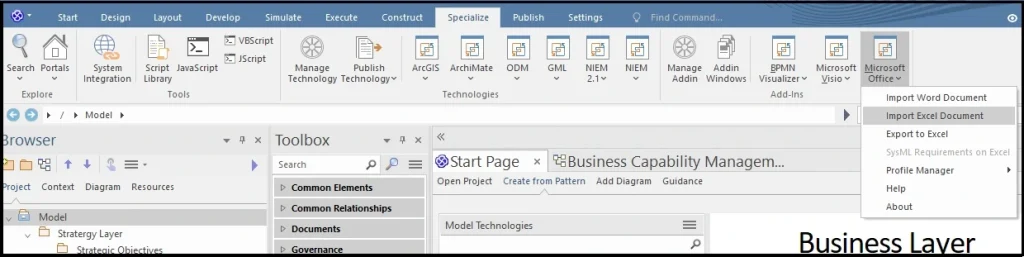
- In the Document to Import field and choose the “Application Portfolio Management – Excel Template” document.
- Select the Work Sheet as Organization and choose the Profile as TEA-Organization.
- Click Preview for a quick review and you can start importing.

- Make sure that all the data is imported and move the imported elements to a relevant package by following steps below in the “Moving elements between packages” section.
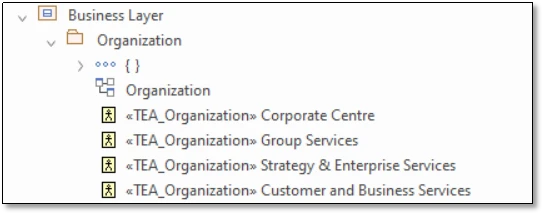
When the import completes, EA will create elements for each row in the selected package.
Moving elements between packages
Depending on how your integration is configured, imported elements may initially appear in a temporary package such as New Package. If that happens:
- Open the temporary package and select all the imported elements.
- Drag and drop them into the appropriate catalog package (for example, Stakeholders, IT Application Owners, Projects, Domains or Sub‑Domains).
- Once the elements are moved, delete the empty temporary package.
Keeping the catalog packages aligned with the APM model patterns created earlier will make dashboards and reporting simpler later on.
Importing Sub Domains Using Excel Spreadsheet
In the APM Excel template, Sub‑Domains are usually imported after Domains so that each Sub‑Domain can be linked to the correct Domain in the APM model.
- Select the “Domain” package under “Application Layer” from the Sparx EA Project Browser.
- Open the Excel Importer window by navigating to Specialize > Microsoft office > Import Excel Document.
- In the Document to Import field and choose the “Application Portfolio Management – Excel Template” document.
- Select the Work Sheet as Sub Domains and choose the Profile as TEA-SubDomain.
- Click on Preview for a quick review and select Import.
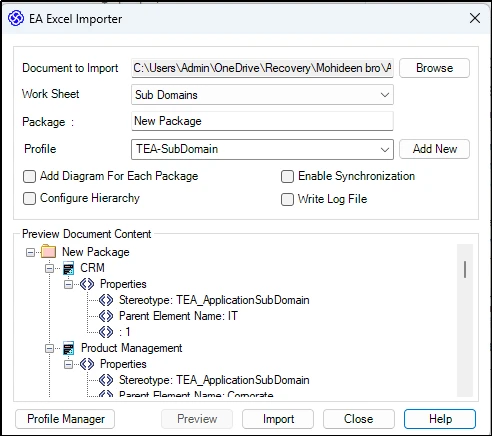
- In order to establish relationships between Domain and Sub-Domain elements, the Specify Connector Mappings pop-up will appear.
- Click on Additional Packages, select the Domain package and click OK.
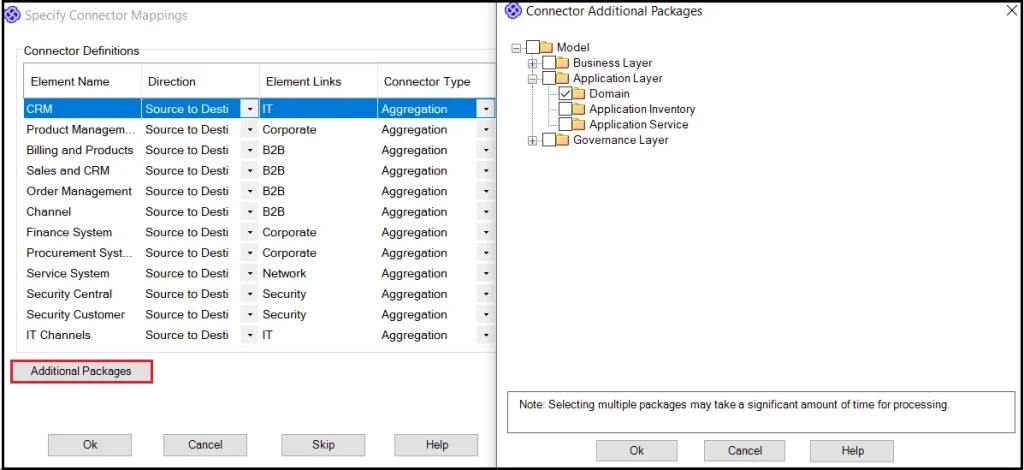
- Once the import completes, all the Sub-Domain data will be imported from the sheet directly to your EA model with the respective domain mappings.
Importing Application Using Excel Spreadsheet
With the reference data in place, you can now import your Application Inventory into the APM model using the Excel template and the TEA-Application import profile.
Steps
- In the Sparx EA Project Browser, select the “Application Inventory” package under “Application Layer”
- Navigate to Specialize > Microsoft Office > Import Excel Document to open the Excel Importer window.
- In the Document to Import field, choose the Excel file “Application Portfolio Management – Excel Template.xlsx”.
- In the Excel Importer, set the “Work Sheet” to Application Inventory and choose the “Profile” as TEA-Application.
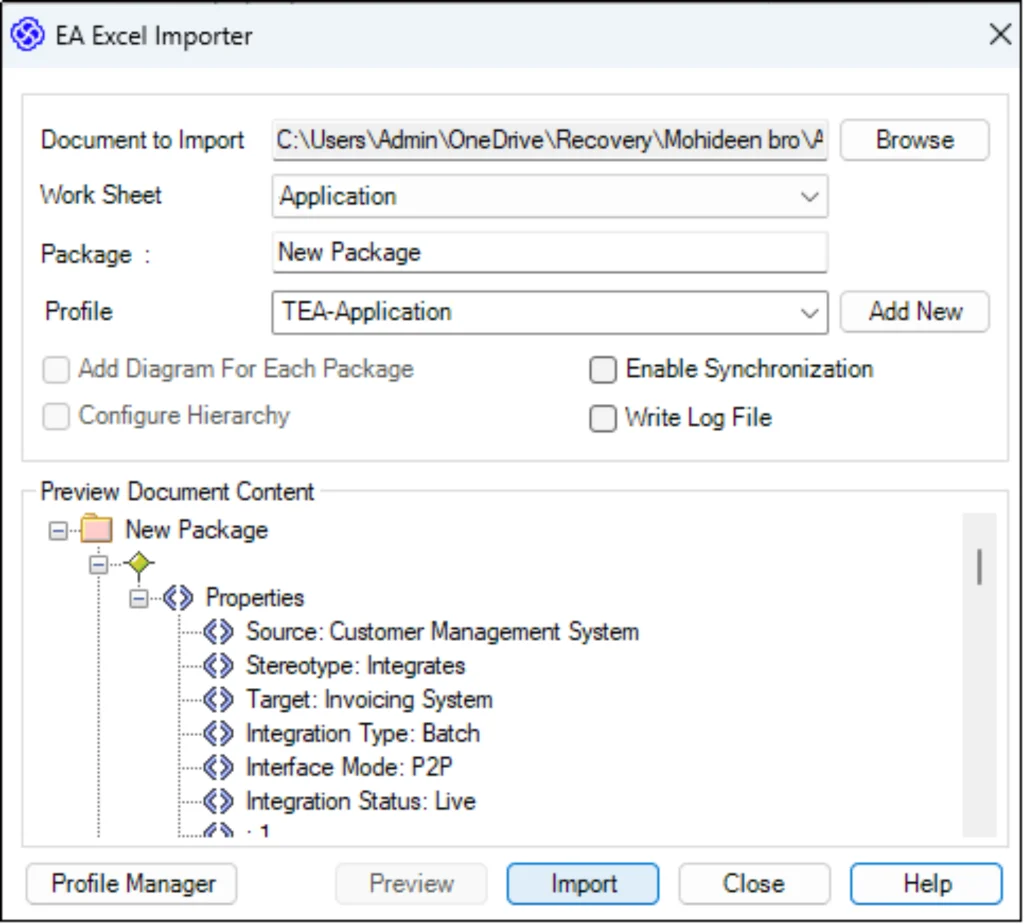
- Check “Enable Synchronization” and choose an appropriate file path for the new Excel file that will be created with GUID information for the Applications.

- Click Preview and Import to review the data and then start the import.
- When the “Specify Connector Mappings” window appears, click Additional Packages.
- Select all relevant APM packages (for example, Domains, Sub-Domains, Organizations, IT Application Owners, Projects) and click OK.
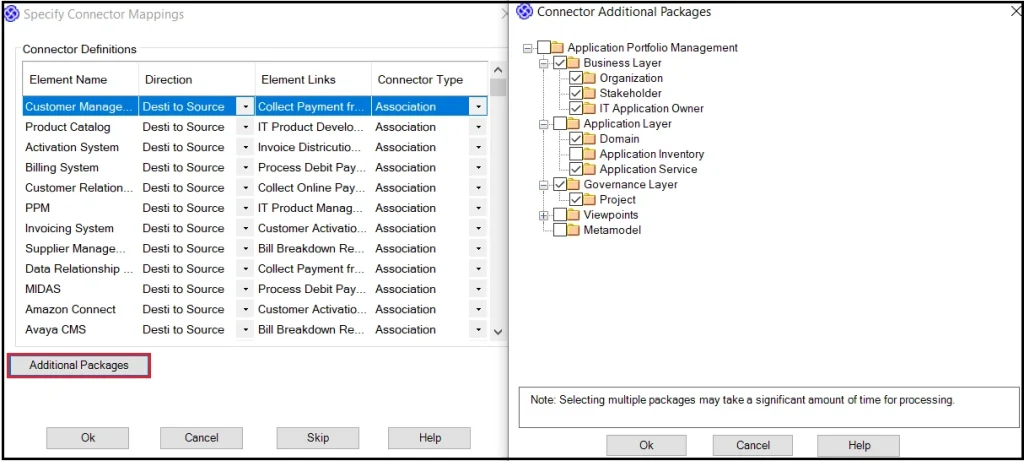
- Click OK again in the Specify Connector Mappings window to confirm the mappings.
- The Application Inventory data available in the sheet is imported successfully into a New Package with the appropriate mappings.
- Move the imported Application elements from the New Package into the Application Inventory package by following the steps in the “Move Elements between Packages” section above.
- Once the Applications and their mappings to other APM elements are imported, proceed to the next section to synchronize GUID information in the Application Integration sheet before importing integrations.
Synchronize GUID Information In Application Integration Sheets
Prior to importing application integrations, you need to synchronize the GUID information from the Application Inventory sheet with the Integration sheet in the synchronized Excel file that was generated when you enabled synchronization during the Application import.
Note: The Application Inventory sheet in the synchronized workbook contains a column with EA GUID information for each Application. You may need to expand the column to see the GUID values.
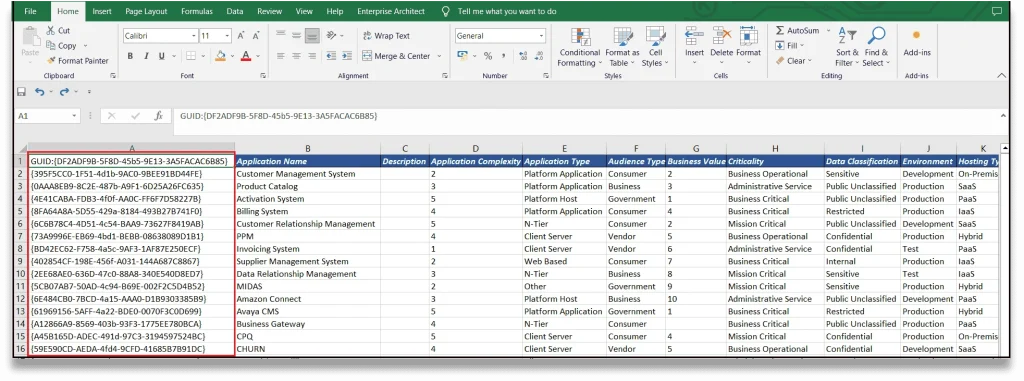
Steps
- Open the synchronized Excel workbook that contains the GUID information for the Applications.
- In the Application Inventory sheet, move the GUID column from Column A to Column B, so it sits immediately to the right of the Application Name column.
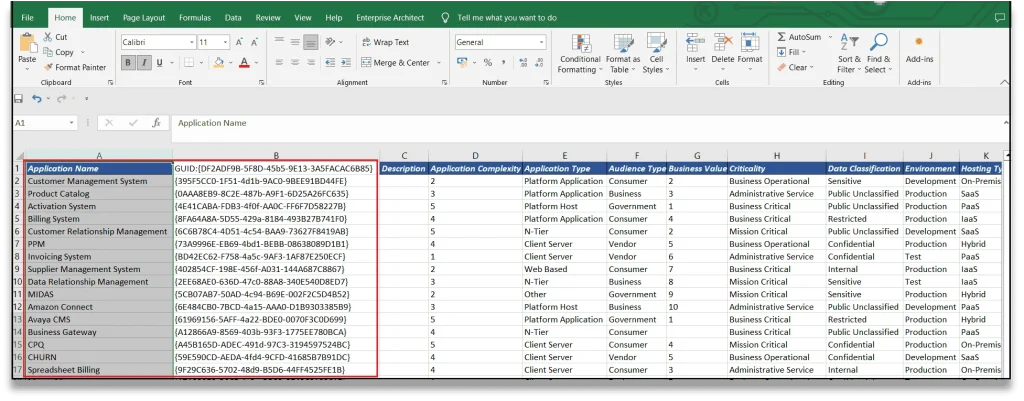
- Next, open or navigate to the Integrations sheet.
- In the Source GUID column, select cell A2.
- Enter the VLOOKUP formula in cell A2: =VLOOKUP(B2,’Application Inventory’!$A:$B,2,0)
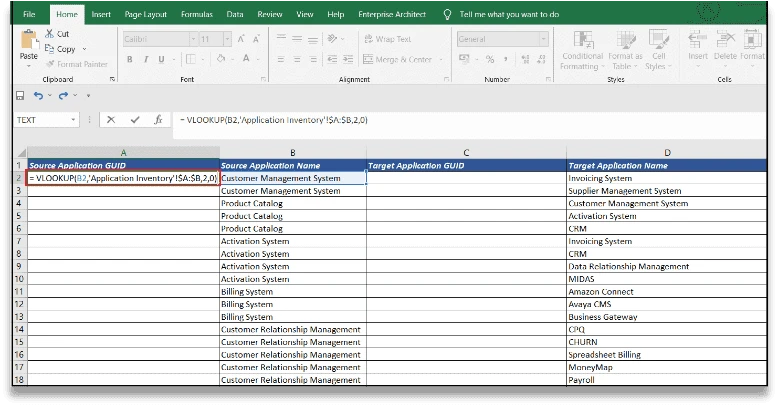
- Drag the formula down so that every row in the Source GUID column is populated.
- Copy the entire Source GUID column (Column A) and use Paste Special → Values to overwrite the formulas in the same column (Column A) with fixed GUID values.

- In the Target GUID column, select cell C2.
- Enter the VLOOKUP formula in cell C2: =VLOOKUP(D2,’Application Inventory’!$A:$B,2,0)
- Drag the formula down so that every row in the Target GUID column is populated.
- Copy the entire Target GUID column (Column C) and use Paste Special → Values to overwrite the formulas in Column C with fixed GUID values.

At this point, every integration row has both Source GUID and Target GUID populated with EA GUIDs from the Application Inventory sheet.
Import Application Integration
Once the Integrations sheet has been updated with GUID information for each Application, you can import the application integrations into EA using MDG Integration for Microsoft Office.
Steps
- In the Sparx EA Project Browser, select the “Application Inventory” package under “Application Layer”.
- Navigate to Specialize > Microsoft Office > Import Excel Document.
- In the Document to Import field, choose the synchronized Excel file “Application Portfolio Management – Excel Template(1).xlsx” that contains the GUID information.
- Set the Work Sheet to Integrations and choose the Profile as TEA-ApplicationIntegration.
- Click Preview and Import to review the data and then start the import.

- The integrations are created between the Applications with the appropriate integration information (such as Integration Type, Interface Mode and Integration Status).
- If the import creates a new package under Application Inventory, move any imported elements or connectors as needed and then delete the temporary package, following the same approach described in the “Move Elements Between Packages” section.
Validating Your APM Catalog in Sparx EA
After all imports are complete, it is worth spending a few minutes validating the model.
Spot checks after import
A few simple checks go a long way:
- Counts – Do the numbers of Organizations, Applications and Integrations roughly match your Excel sheets?
- Navigation – From a given Application, can you navigate to its Domain, Owner, Stakeholders and related Projects where applicable?
- Integrations – Pick a few integrations from the Excel sheet and check that the same connections exist between Applications in Sparx EA.
If something looks off, it is usually easier to correct the spreadsheet and re‑run the import than to manually fix large numbers of elements.
Common pitfalls and quick fixes
Some typical issues and responses:
- Elements in the wrong package – Move them into the right catalog package and adjust the import target package next time.
- Missing or broken integrations – Recheck the Source and Target names/IDs and the GUID lookup formulas in the Integration sheet.
- Duplicates – Agree naming conventions in Excel and use synchronization profiles so that updates change existing elements rather than creating new ones.
Treat the first import as a learning pass. Once the mapping is stable, subsequent imports become routine.
What You’ll Have at the End of This Guide
By the time you complete these steps, you will have:
- The APM MDG enabled and the standard APM catalog structure created in a real EA project
- Your reference data (organizations, stakeholders, owners, projects, domains) loaded into the correct catalogs
- A populated Application Inventory that reflects your real landscape
- Integration connectors between applications, based on GUID‑driven imports

In other words, you now have a governed APM model that is well structured and is ready to drive diagrams and dashboards.
Start your APM journey. Learn the fundamentals of portfolio setup, defining risk categories, and building your first dashboards with Sparx EA and Prolaborate.
What’s Next: Turning the Model into Diagrams and Dashboards
With a clean APM model in place, you can now start using it for communication and analysis rather than just storage.
In the next guide, we will look at:
- Using the APM Model Add‑in to generate integration diagrams and Prolaborate dashboards automatically from your Application catalog
- Importing the preconfigured APM dashboards into Prolaborate
- Turning your model into views that CIOs, architects and business owners can use to explore, question and act on your application portfolio
At that point, the Accelerator will have taken you from scattered spreadsheets to a living APM model with visualizations that can support real decision‑making.


